Back at the Easel
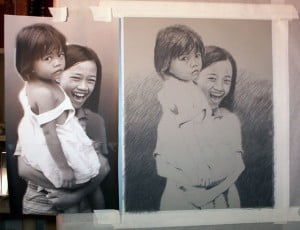
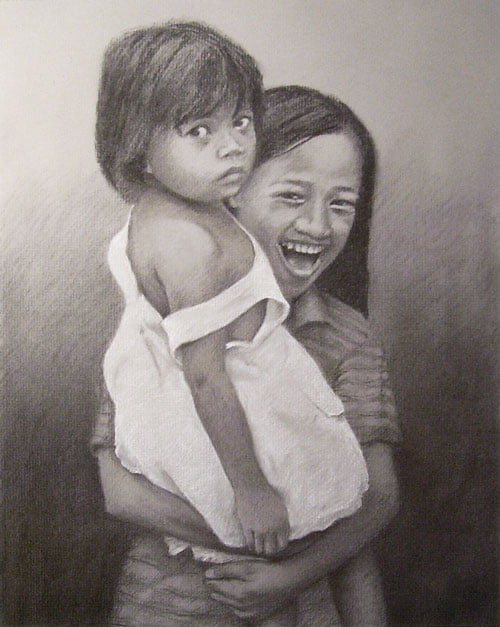
Hello friends. At long last I was able to get back into the studio (a.k.a. – the corner of my bedroom) and revisit the vine charcoal drawing I’ve been working on since September. Fall is the busiest season at my company – October in particular – and things have finally begun to quiet down enough that I can concentrate on other pursuits outside of work. Today I was very happy to be able to put in 6 solid hours of drawing – enough to bring my current piece to completion.

In my last entry, I discussed some of the problems that I was encountering with the Windsor & Newton vine charcoal – mainly the medium density being too soft (making very dark lines) and the hard density being almost too hard (sometimes barely making a line at all!). These problems persisted, even after testing out several medium and hard sticks to see if perhaps I had merely gotten hold of a bad batch. Perhaps on my next drawing I’ll try another brand… Regardless of these slight difficulties, I found most of my success in using the hard sticks and being extremely patient – slowly building up tone. More than once today I thought I just couldn’t take shading that little girl’s arm anymore and was ready to call it quits. Thankfully, my wife talked some sense into me and urged me to be patient and do it right, rather than settle with less than my best effort.
Today I decided to try some blending techniques. Originally, I had intended not to, but due to a mistake that I discovered after beginning the drawing I thought it best to blend the charcoal to achieve the desired results. What was the mistake? I used the wrong side of the paper. Yep… Hey, how was I to know that the good folks at Canson Paper make one side of their Mi-Tientes charcoal paper smoother than the other side? This was pointed out to me by Mr. Darren Rousar, author of Cast Drawing Using the Sight-Size Approach. Thanks so much, Mr. Rousar, for your keen observation – I may have gone on indefinitely wondering why my drawings were showing so much more of a pattern than other works I’ve seen done on the same paper!
Anyway, in order to fill in some of the pattern holes, I used a small, cheap hobby brush with synthetic bristles to wipe around some of my darkest background areas. This worked pretty well, although I had to be careful not to get too cavalier with my brushing, as it was very easy to take too much off the paper. For smaller areas with fine detail, I found a combination of kneaded eraser and chamois to be more suitable. In the end, the detail areas can’t have much blending, unless you’re using a paper stomp. I haven’t had much success with stomps in the past, so I didn’t bother going that direction.
After I had the charcoal built up as much as I felt it could be, I then heightened the drawing with a General’s white charcoal pencil. This ended up being a very tricky process and I accidentally discovered a good way to use it without having it completely throw off the contrast of my drawing. Actually, I’m most thankful that I didn’t completely ruin my drawing with it, as I was having some panic moments while first laying it down. The white charcoal goes down very robustly, even while using light pressure. This, in turn, made my drawing look a bit disjointed. The highlights were becoming too light and I was losing my illusion of reality. I found that if I began to erase the white charcoal with the kneaded eraser, it erased a little, but also blended a little, toning down the highlights quite a bit. This was unexpected, but I found that if I was very careful, I could control the highlights fairly well using this method. After blending/erasing a bit, it is necessary to go back to the same spot with a hard charcoal stick and blend the edges (to contour the form properly).
For the little girl’s dress, I completely covered the area with white charcoal, then blended the larger areas with a chamois. I then used my kneaded eraser in a reductive fashion to pull out some of the shadows in the folds of the dress. These were later reinforced with very light shading from a hard charcoal stick.
At this point, the drawing looked to be pretty well finished. Therefore, I did the next appropriate step – I went out for a coffee and read for a couple of hours. Upon returning, I discovered some tiny details that needed to be added, minor corrections that needed to be made, etc. Now it’s finished! As always, I see some areas that need to be improved and there are some wonderful subtleties in the white dress that the camera just can’t reproduce. However, I’m fairly pleased with my first attempt at vine charcoals. Enjoy!
