A Boot-Maker With No Boots…
Since late June I’ve been working through the Bargue course as well as the painting from the previous post, “Oil Painting – More Progress”. My work on the Bargue course is, of necessity and design, a long-term project that will likely last some years. At the same time, my painting is progressing slowly – also out of necessity. Wouldn’t want to screw it up by rushing, would I? Anyway, I’ve got the opportunity to exhibit with the local art organizations this Fall, but am sadly lacking any new finished pieces to show. With this in mind, I decided to begin a new drawing in the hopes of having it ready for any upcoming shows in which I would like to participate. While I feel that it’s important to have my work out in the public eye, I’m nowhere near being ready to “exhibit” yet. Two years ago I set out with the goal to build up a body of work for this purpose, but along the way I learned some important lessons about myself and my abilities, read lots of books, and expanded my knowledge of the craft of drawing and oil painting. Naturally, this has led me to experiment with new techniques, change my artistic direction and develop new goals. So, for now the exhibiting will have to wait…
A Lingering Inspiration

In 2004, an acquaintance of mine was traveling in Indonesia and snapped a photo of a big group of children that he later e-mailed me. I’ve always loved this photo, and was particularly fond of how he captured the girl in the center holding the baby in her arms. She has a wonderful smile on her face, and the baby’s expression is a picture of pure innocence. I had always thought it would make a nice drawing, but never got around to planning it out. Now it will finally come to fruition!
The Process
 To organize my thoughts and decide how to approach this subject, I utilized my graphic design skills and worked with the image in Photoshop to do some quick problem-solving. This is an extremely “busy” image, so after deciding on cropping, the size of the drawing, etc., I then erased out all the unnecessary background info and “faked in” the area of the girl’s shoulder that is obscured by the other girl waving in the foreground. I then threw in a background gradient which I had been envisioning for the finished drawing to give it some depth.
Now the image needs to be transferred onto the drawing paper at the correct size. I have chosen to work with charcoal on a piece of light-gray Canson Mi-Tientes charcoal paper. However, I won’t even touch my final paper until I have the drawing clearly mapped out to the proper scale first. The image will be 11″ x 14″ to be placed in a 16″ x 20″ frame (planning this from the beginning makes it much easier to find a frame that will fit your budget when the work is complete).

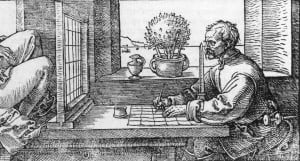
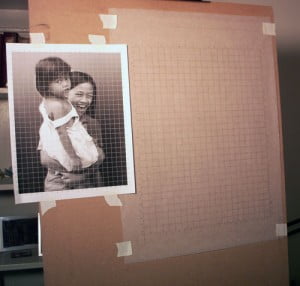
To scale the image up to 11″ x 14″ I will use the “Dürer Grid” – so named because of a woodcut by Albrecht Dürer from 1525 that depicts a draughtsman using a wooden grid device to draw a foreshortened view of his subject. This is one of the simplest ways to scale your drawing to your chosen size. You’ll notice in the woodcut that the artist has a small obelisk sitting on the table in front of him. By always keeping his right eye in line with the point of the obelisk, he assures that his view of the 3-dimensional scene will not change. I don’t have to worry about that with my drawing since I’m working from a flat reference photo. All I need to do is make sure that the grid that I put over my photo corresponds to the grid that I draw on my paper.

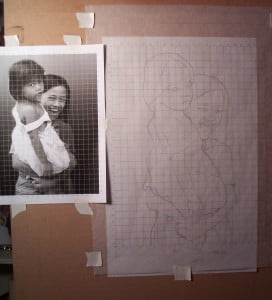
For this first step, I will work in graphite pencil on a sheet of tracing paper (you can use any thin paper for this step). I don’t wish to draw a grid on my final paper, as it will cause unnecessary marks that will have to be erased. By completing this step on the tracing paper, I can then transfer it easily to my final paper.
I have divided my 11″ x 14″ picture plane into half-inch intervals for the sake of simplicity. Of course, your grid can be much larger if you prefer, but I normally use a tight grid since I primarily draw people – wherein I need to make sure I attain a good likeness. The tighter the grid, the less room for error…

The line drawing is completed in about 1-2 hours and I’m now ready to transfer it to the final paper.
If this were a 19th century academic painting, we would call the tracing paper line drawing a cartoon – a full-size preliminary drawing done as a preparation for the final piece (usually an oil painting). One way the masters used to transfer their drawing from the cartoon to the canvas was called pouncing, which involved poking pin-holes along major lines in the drawing, laying it over the primed painting surface, and tapping it with a little pouch of cheesecloth filled with charcoal powder. The powder would leave an impression along the pin-hole lines on the canvas allowing the painter to then begin drawing in the composition with thinned oil paint.
Another method is to rub charcoal dust on the back of your cartoon, place it over your painting surface, and simply trace over the lines lightly, leaving a charcoal impression of the drawing behind.
Yet another method is a modern alternative – transfer paper. Transfer paper looks very similar to wax paper and has one side coated in a dusting of pigment (it comes in a variety of colors). Again, if the artist places this between his painting substrate and the cartoon, he can simply trace over the line drawing to transfer it.
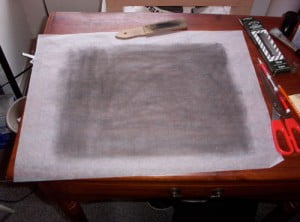
 I’ll be using the second method mentioned above – a rubbing of charcoal dust on the back of my cartoon. If you remember my fabulously popular post on how to sharpen vine charcoal, you’ll remember that I mentioned the importance of saving your charcoal dust for later use. Here is a fine example. Never throw away any useful art supply! After sparingly pouring some out on the back, I rubbed it around with a paper towel to coat the paper.
Next, all I need to do is lay it over my piece of charcoal paper, trace the lines, and my drawing is transferred. Easy! Now I’m ready to begin the best part – the actual drawing (it’s about time)!
To be continued…